Creating Kubernetes Namespaces in Microtica: A New Dashboard Feature

When you need to create Kubernetes namespace, it’s important to understand how namespaces help organize and isolate resources within a cluster. The process of Kubernetes create namespace can significantly improve efficiency, especially when managing multiple projects, environments, or teams. With Microtica, this process is made seamless through an intuitive dashboard that simplifies namespace creation and management. In this article, we’ll explore how you can leverage Microtica to easily create and manage Kubernetes namespaces, along with best practices and troubleshooting tips to ensure smooth operations.
What are Kubernetes Namespaces?
In Kubernetes, namespaces provide a mechanism for isolating a group of related resources (e.g. Pod, Deployment) within a single cluster. Pods within the same namespace can communicate and potentially share resources.
Any resource in Kubernetes is either in the default namespace or the namespace created by the cluster operator. The default namespace is where every Kubernetes resource is created by default unless anything else is specified. The whole cluster can be considered as the default namespace.
You can create multiple namespaces within a Kubernetes cluster. This is really useful for organizing, in order to be able to better coordinate changes between different codebases. Knowing how many namespaces to create and what for really depends on the use case you have. If the project is small, with a couple of microservices, it makes sense to operate in the default namespace. But if you want to include some granularity and divide the resources for development and production you will need at least two namespaces. Maybe you want to manage multiple projects and applications on the same cluster, then you need a proper namespace strategy.
What Problem do Namespaces solve?
One use case for Kubernetes Namespaces is to split a cluster into logical partitions so that it can be used by several users and teams, or a user that has numerous applications. Each user, team, or app that is operating in a namespace is completely isolated from every other Kubernetes namespace in the cluster, and they give the impression of being the only user within the cluster.
Namespaces can also be utilized to specify specialized sets of permissions, particularly those pertaining to Role-Based Access Control (RBAC). Namespaces can be managed by a Kubernetes administrator to create groups with shared permissions and roles. It's a great way to add additional layers of security to the environment.
Another use case for namespaces is good resource management. Admins can define resource usage quotas to make sure one namespace does not use all of the available CPU or memory capacity.
Creating a Kubernetes Namespace
In order to create a Namespace in Kubernetes, use the following command:
kubectl create namespace testspaceAlternatively, you can define the namespace in a YAML file and apply it:
testspace.yaml
kind: Namespace
	apiVersion: v1
	metadata:
	name: testspace
	labels:
		name: testspace
Apply the file with:
kubectl apply -f testspace.yamlOnce the namespace is created, you can begin organizing your resources within it to streamline management and improve efficiency.
How To create resources in a Namespace?
When deploying resources in Kubernetes, you must specify the target namespace; otherwise, they will be placed in the default namespace.
There are two ways to do this when using Kubernetes to create namespace functionality:
1. Using the --namespace flag during deployment:
bash
kubectl apply -f pod.yaml --namespace=testspace
This ensures the resource is created in the specified namespace.
2. Defining the namespace in the YAML file:
yaml
apiVersion: v1
kind: Pod
metadata:
	name: testpod
    namespace: testspace
    labels:
    	name: testpod
spec:
 containers:
  -	name: testpod
    image: nginx
When a namespace is specified in the YAML file, the resource will always be created there. If you attempt to override it with the --namespace flag, the command will fail.
To create namespace in Kubernetes properly ensures better organization, preventing resource conflicts and making it easier to manage deployments across different environments.
Multiple Kubernetes namespaces
Using multiple Kubernetes create namespace commands is recommended when managing multiple teams or projects within a single organization. Each team can have its own virtual cluster, isolating workloads while ensuring resource separation. This prevents teams from unintentionally affecting each other's deployments unless explicitly configured through access controls.
Namespaces are also useful for application development environments. Separating testing, staging, and production environments within distinct namespaces helps maintain clear boundaries between in-development code and live production services. This approach reduces deployment risks and streamlines collaboration between developers, testers, and operations teams.
Best Practices for Namespace Usage
Effectively managing namespaces in Kubernetes helps maintain a structured, secure, and scalable cluster. When using Kubernetes create namespace, following best practices ensures better organization and resource isolation.
Consistent Naming Conventions
Establish a clear and uniform naming convention for namespaces to avoid confusion. Use names that reflect their purpose, such as:
- dev, staging, and prod for different environments
- team-marketing, team-engineering for team-specific namespaces
- project-x-backend, project-x-frontend for application components
Consistent naming makes it easier to manage resources and understand their function at a glance.
Avoid Overusing the Default Namespace
By default, Kubernetes places resources in the default namespace if none is specified. While convenient, this can quickly lead to an unorganized cluster where unrelated workloads are mixed together. Instead:
- Use Kubernetes create namespace to define dedicated namespaces for applications, environments, or teams
- Reserve the default namespace for temporary or non-critical workloads
- Use network policies and quotas to manage namespace resource allocation
This ensures better separation, making troubleshooting and scaling more efficient.
Implement Role-Based Access Control (RBAC)
Namespaces allow for better security and access control through Kubernetes' Role-Based Access Control (RBAC). To prevent unauthorized access and limit potential disruptions:
- Assign specific permissions to users and service accounts within each namespace
- Use Roles for namespace-scoped permissions and ClusterRoles for cluster-wide access
- Implement RoleBindings to grant users access only where necessary
Properly configured RBAC reduces security risks while ensuring teams have the necessary access to perform their tasks.
How Microtica Simplifies Namespace Management
How does Microtica work? Microtica simplifies managing Kubernetes namespaces with its intuitive features and user-friendly interface. Whether you're managing a single namespace or multiple environments, the process of creating Kubernetes namespace becomes easier with the platform’s streamlined tools and enhanced capabilities.
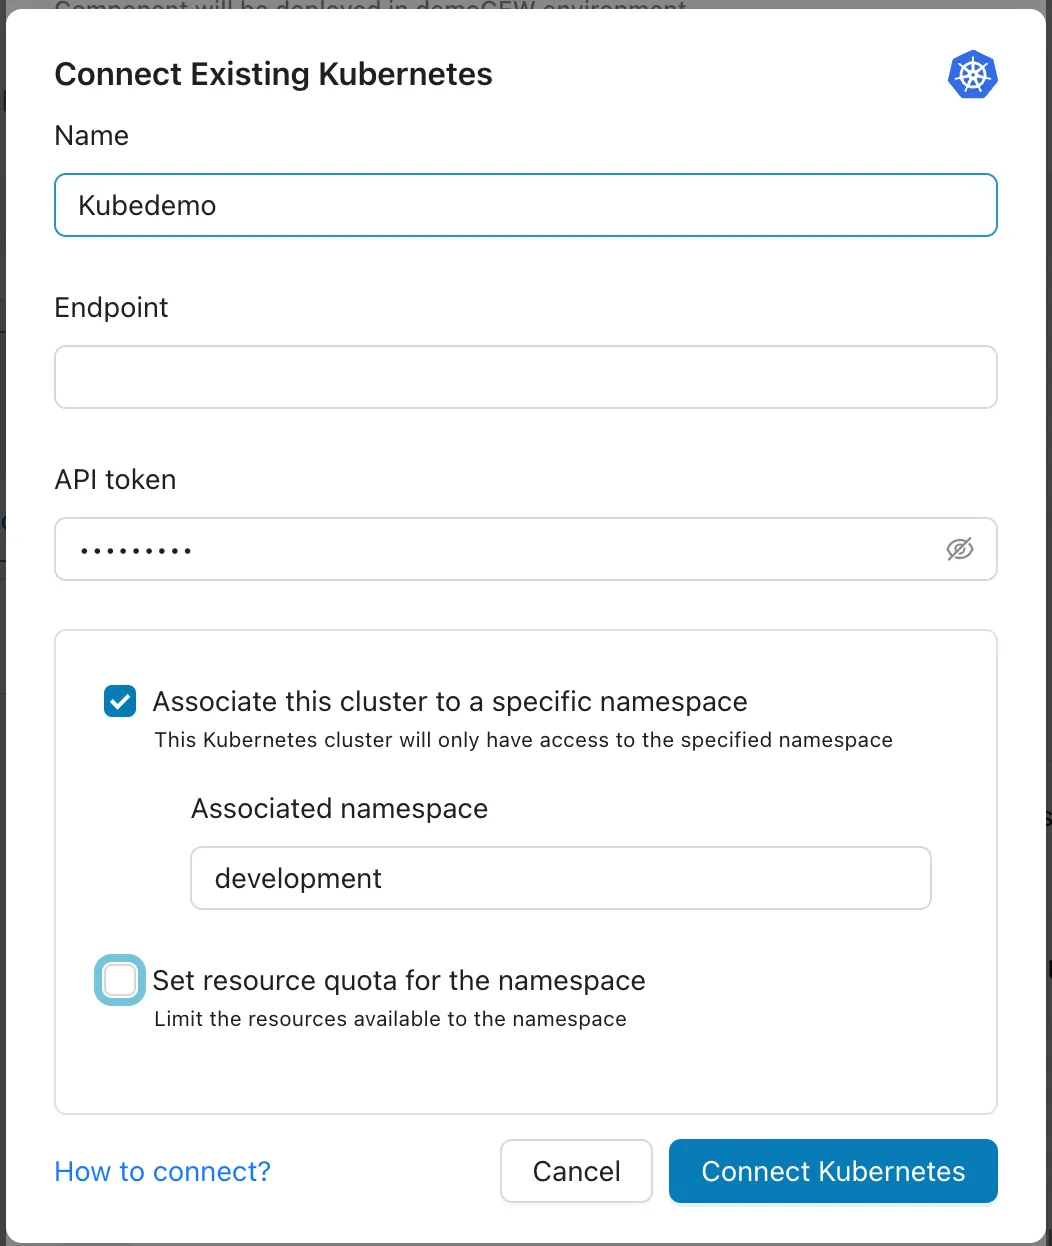
User-Friendly Interface
The clean, organized dashboard in Microtica is designed to help developers working with Kubernetes easily navigate through various management tasks. Whether you are creating, editing, or deleting namespaces, the interface makes these processes smooth and efficient.
For new users or those unfamiliar with Kubernetes, Microtica offers clear prompts and instructions throughout the process. When you need to Kubernetes create namespace, you are guided through the required steps, ensuring you can set up your namespaces without complications or confusion.
Enhanced Collaboration
With Microtica, collaboration becomes easier. Multiple users can access and manage namespaces, allowing for greater flexibility when working in teams. You can delegate tasks, review namespace configurations, and ensure everyone stays on the same page, no matter where they are.
Microtica’s platform is designed to fit seamlessly into your team’s existing workflows. By integrating namespace management into your daily processes, you can streamline operations and ensure that your Kubernetes resources are handled with precision and care. When your team is aligned and working together, your overall efficiency increases.
Improved Efficiency
Setting up namespaces is quicker with Microtica. Automated processes speed up the creation of namespaces and other Kubernetes resources, allowing you to focus on your application rather than manual configuration. Whether you're deploying for a single environment or multiple teams, you'll save time while maintaining control.
Microtica enables centralized management of all your namespaces, allowing you to oversee multiple namespaces from a single dashboard. This unified approach reduces complexity and the potential for errors, helping you maintain consistency across environments. With Kubernetes create namespace simplified in one place, your team can avoid unnecessary mistakes and spend less time managing resources.
Troubleshooting Common Issues When Creating Kubernetes Namespaces
While creating Kubernetes namespaces is a relatively straightforward task, there are some common issues users might encounter during the process. Below are some potential problems and their solutions to help ensure a smooth experience when using Kubernetes create namespace.
1. Issue: Namespace Already Exists
Problem: When attempting to create a namespace that already exists, Kubernetes will return an error indicating the namespace cannot be created.
Solution:
Before attempting to create a namespace, check whether the namespace already exists by using the following command:
bash
kubectl get namespacesIf the namespace exists, you can either modify the existing namespace or choose a different name for your new namespace.
2. Issue: Insufficient Permissions
Problem: You may encounter a permissions issue if the user account does not have the appropriate access rights to create namespaces.
Solution:
Ensure you have the necessary permissions to create namespaces. This typically requires cluster-admin privileges. To verify your permissions, check the role bindings using:
bash
kubectl describe clusterrolebinding <your-role>If you don’t have the necessary permissions, request your system administrator to assign you the correct role or access rights.
3. Issue: Resource Quotas Not Set Properly
Problem: When creating a namespace, you may fail to allocate appropriate resources like CPU and memory, causing issues when resources are overused or underutilized.
Solution:
Make sure you define resource quotas when creating a namespace. You can create a resource quota in your namespace using a YAML file:
yaml
apiVersion: v1
	kind: ResourceQuota
	metadata:
    	name: resource-quota
    	namespace: <your-namespace>
spec:
 hard:
 	cpu: "4"
 	memory: 8Gi
This will help prevent resource over-usage and ensure your namespace has enough resources.
4. Issue: Namespace Not Visible After Creation
Problem: Sometimes, a newly created namespace might not appear in the list of namespaces in your Kubernetes environment.
Solution:
It’s possible that the namespace creation process didn’t complete successfully. To check the status of your namespaces, use the following command:
bash
kubectl get namespacesIf the namespace is not listed, retry creating the namespace and check for any error messages that might indicate the cause of the failure.
5. Issue: Namespace Not Being Applied in YAML Files
Problem: If you specify a namespace in your YAML file but the resource is created in the default namespace, it could be due to incorrect syntax or misconfiguration in your YAML.
Solution:
Ensure that the namespace field is correctly specified under metadata in your YAML file. The correct syntax should look like this:
yaml
apiVersion: v1
	kind: Pod
    metadata:
    	name: testpod
namespace: <your-namespace>spec:
containers:
	- name: testpod
    	image: nginx
Double-check that the namespace is defined correctly and that the resource is being applied to the intended namespace.
By following these troubleshooting tips, you can resolve common issues when creating Kubernetes namespaces and ensure a smooth and efficient experience.
Summary
Managing Kubernetes namespaces efficiently is essential for maintaining a well-organized and secure cluster, especially as your team or project grows. By following best practices such as using consistent naming conventions, avoiding overuse of the default namespace, and implementing role-based access control (RBAC), you can optimize your namespace management. Microtica simplifies the process of Kubernetes create namespace with its user-friendly interface, enhanced collaboration features, and improved efficiency. Additionally, troubleshooting common issues, such as permission errors or resource quota misconfigurations, ensures a smooth namespace creation process.
Whether you are working on a single namespace or managing multiple environments, Microtica’s dashboard provides the tools necessary to streamline your Kubernetes namespace management, boost team collaboration, and ensure your resources are properly allocated, contributing to better cost optimization. With Microtica, you can focus on development while leaving the complexities of namespace management to the platform.

Relevant Posts

.webp)