AWS Instance Scheduler Guide: Setup, Cost Savings, and Best Practices

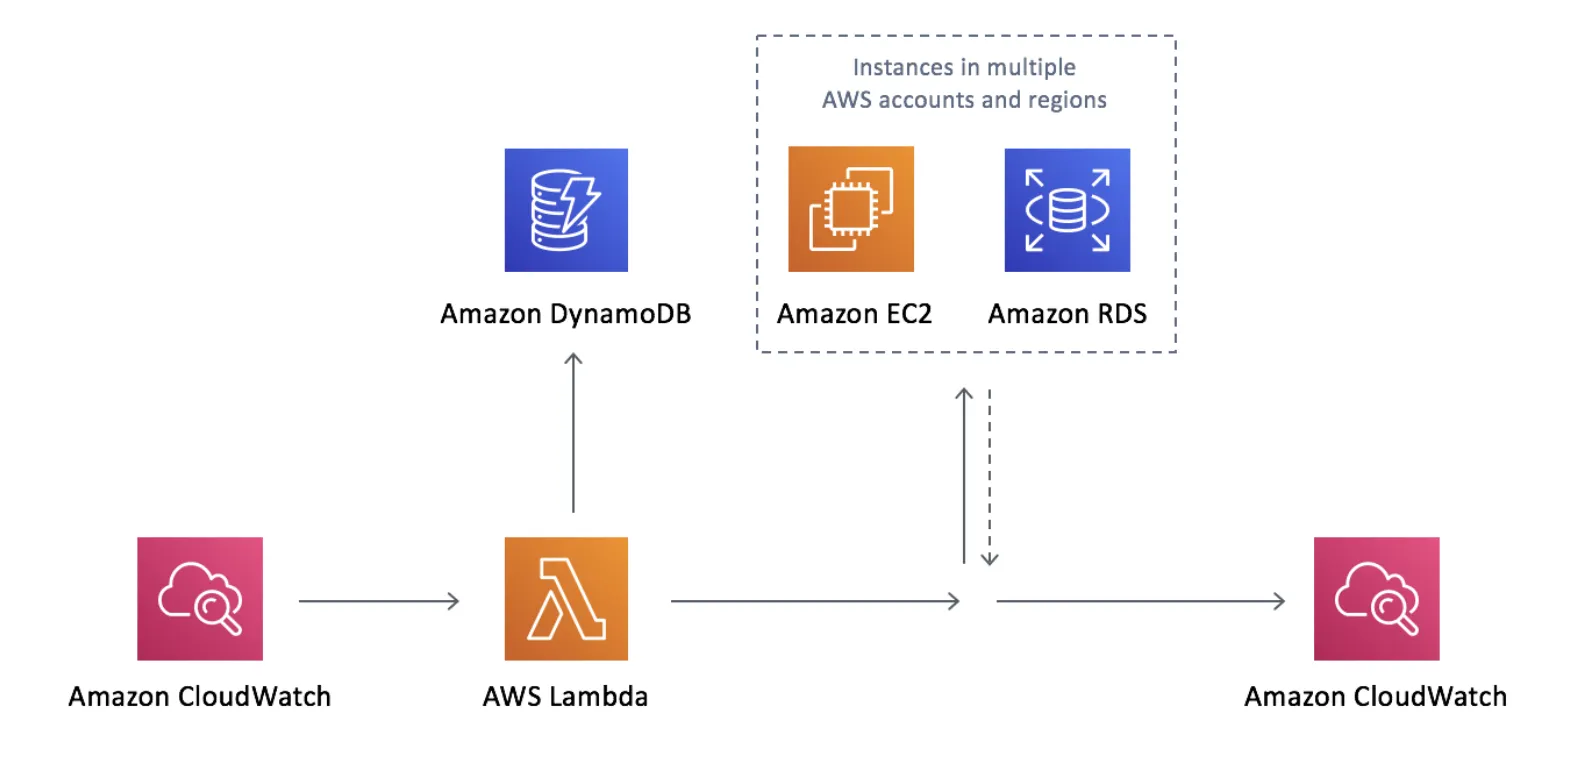
When managing cloud resources, controlling costs while maintaining availability is a top priority. AWS Instance Scheduler is a solution designed to help with this by automating the start and stop times of your EC2 and RDS instances. By running instances only when needed, it helps reduce unnecessary cloud spending and improves operational efficiency. This automation is powered by AWS services like CloudWatch, Lambda, and DynamoDB, which work together to enforce schedules you define and apply via tagging.
What is AWS Instance Scheduler?
AWS Instance Scheduler is an automation solution that manages the start and stop times of EC2 and RDS instances based on predefined schedules. This helps reduce unnecessary cloud costs by ensuring instances only run when needed. It works by using AWS services like CloudWatch, Lambda, and DynamoDB to automate the scheduling process. You define schedules in DynamoDB, tag your instances with the relevant schedule name, and then a Lambda function checks these tags and performs start or stop actions accordingly.
For example, development environments that are only used during working hours can be automatically turned off in the evenings and on weekends, avoiding costs when they’re not in use. The same applies to RDS databases that don’t require 24/7 uptime. This solution is suitable for organisations that want to optimize cloud spending without relying on manual intervention. It also helps standardize resource management practices across teams, ensuring that instances are running only when they provide actual business value.
How AWS Instance Scheduler Works
AWS Instance Scheduler helps cut down on compute costs by automatically turning off instances when they aren't needed. This is particularly useful for development environments or workloads that follow a predictable schedule, such as shutting down during evenings or weekends when no one is using them.
Instead of running instances 24/7, it is recommended to create customized schedules based on usage patterns. Some teams opt for always-stopped schedules, manually starting instances only when required.
This guide walks through setting up AWS Instance Scheduler and applying it across multiple instances.
Benefits of Using AWS Instance Scheduler
Using AWS Instance Scheduler comes with several advantages that can streamline your cloud operations and optimize spending.
- Automates instance start and stop times to reduce cloud costs
- Supports both EC2 and RDS instances
- Enables precise scheduling based on working hours or business needs
- Improves operational efficiency without manual intervention
Overall, these benefits make AWS Scheduler a practical choice for teams looking to automate and simplify their cloud resource management.
Step-By-Step Guide to Setting Up AWS Instance Scheduler
Schedules actually define when the EC2 and RDS instances should be running. Each schedule has a unique name and its configuration is stored in the DynamoDB.
The entire setup revolves around tagging, which is basically a label you give to an instance to be able to categorize it and later quickly identify it. Tags are defined with a key-value pair which you define.
The instance scheduler solution has a default tag key called Schedule. You can of course change it if you need. The tag value should be the unique name of the schedule you want to apply to the instance. Each time the Lambda function runs, it will retrieve the configuration for the schedule from the DynamoDB and apply it to the instance.
For example you could define a tag with key: value = Schedule: work-days. The name work-days specifies a schedule where the instances should shut down on Friday evening and get started up on Monday morning. Therefore, the instances that are supposed to be covered by this schedule should be tagged with the key: value pair. In the example this is Schedule: work-days.
By defining schedules based on work hours or specific needs, you can automate cost-saving measures without manual intervention. In the next steps, we’ll walk through the process of creating and applying these schedules to multiple instances, making sure they operate only when needed
Step 1: Setting Up Instance Scheduler
Firstly make sure you’re signed in in your AWS account. The starting step is to launch the instance schedule stack in your AWS account. You can launch the cloud formation template, but keep in mind that it launches in the US East - N. Virginia region by default, so adjust the region according to your needs. Likewise, verify that the correct template is being used, and move to the next step.

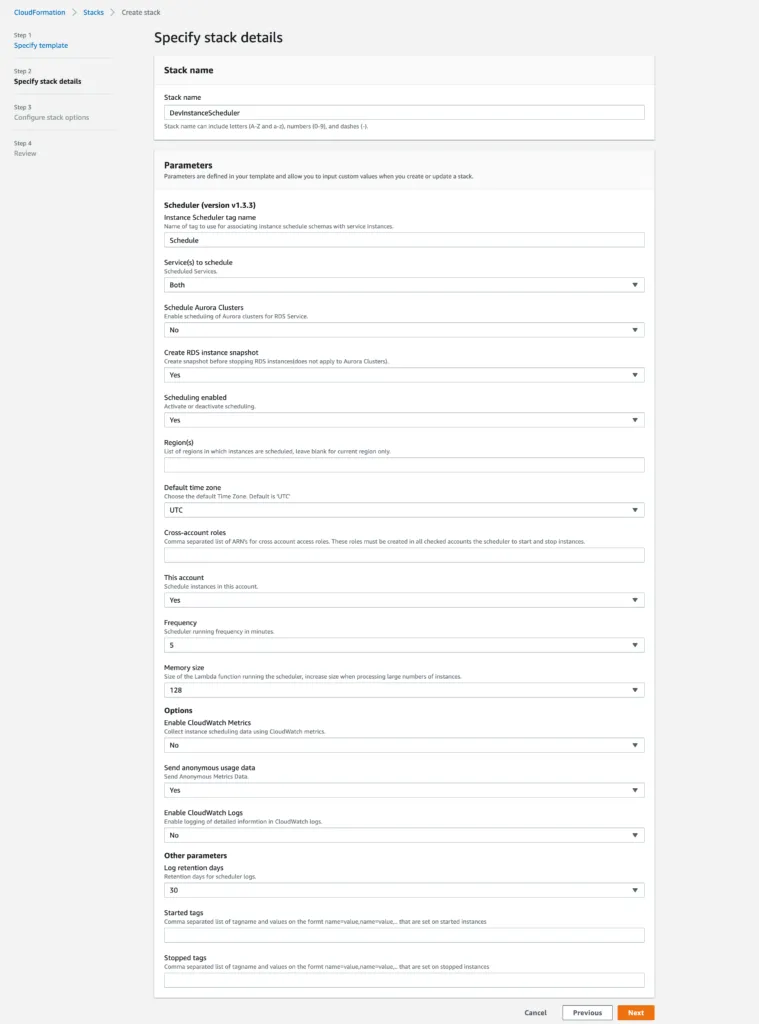
Secondly, you need to define the Stack name and some specific parameters, like tag name (if you’d like to change the default tag name Schedule), which service you want to schedule: EC2, RDS or Both, whether you want and RDS instance snapshot before shutting down the resource, the frequency of running for the AWS Lambda function, whether you want CloudWatch metrics and logs and a couple more parameters.
Thirdly, leave the stack options as they are - empty. Continue to the last step, review the changes and deploy the stack by clicking on Create. In the AWS Console you can follow the status of the stack deployment. CREATE_COMPLETE means that the solution is deployed.
Step 2: Defining Your Instance Schedule

In your AWS console, the AWS Instance Scheduler stores configuration details in an Amazon DynamoDB table called ConfigTable. This table holds schedules and periods, with the most important parameter being the period, which defines when instances should be active. You can specify timeframes as precisely as hours, days, or months. At a minimum, the schedule must include one of the following: begintime, endtime, weekdays, months, or monthdays. The begintime determines when instances start, while endtime specifies when they stop, if only a start time is set, manual intervention is required to stop them.
The ConfigTable includes predefined schedule samples that you can use or customize based on your needs. These configurations help automate instance management, ensuring resources are available only when necessary. A typical period configuration might look like this:
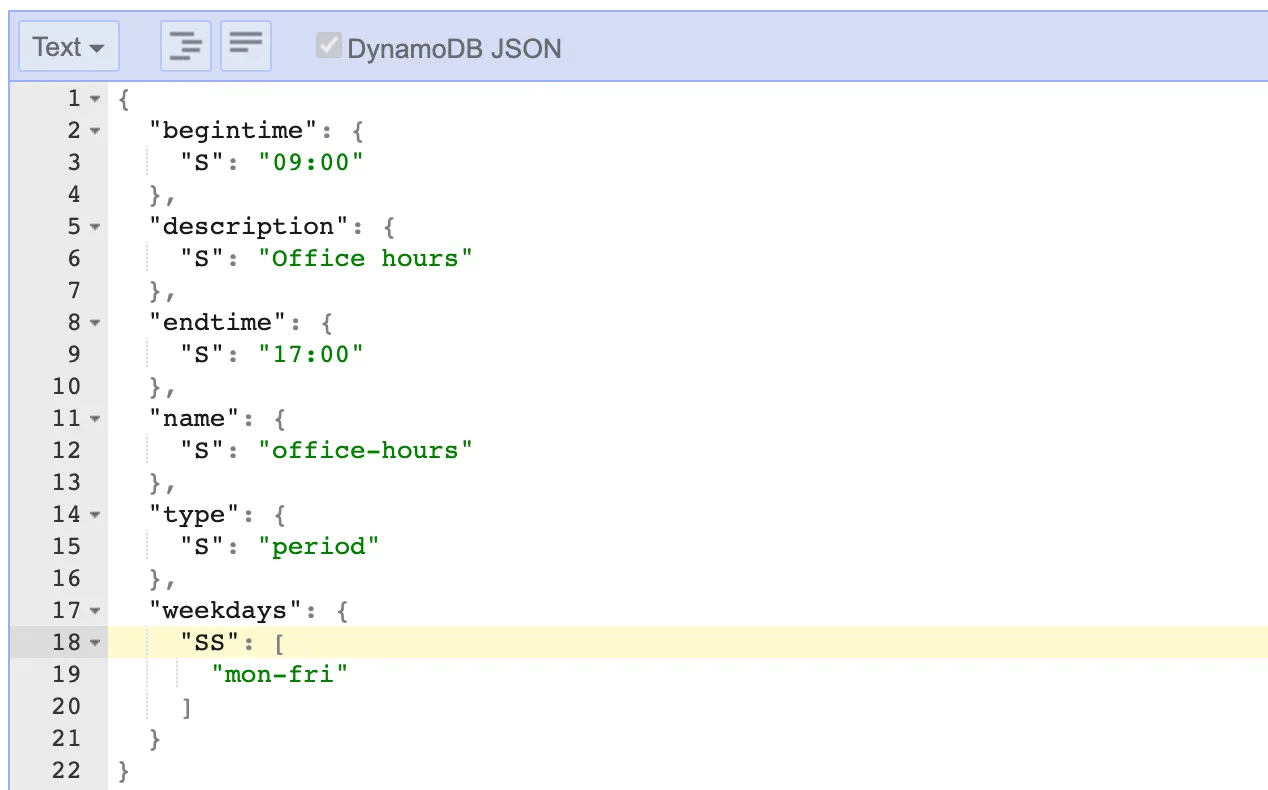
This period defines standard office hours, starting at 9 AM and ending at 5 PM, from Monday to Friday, making it ideal for UK business hours. You can adjust these periods directly in the AWS console to match your needs.
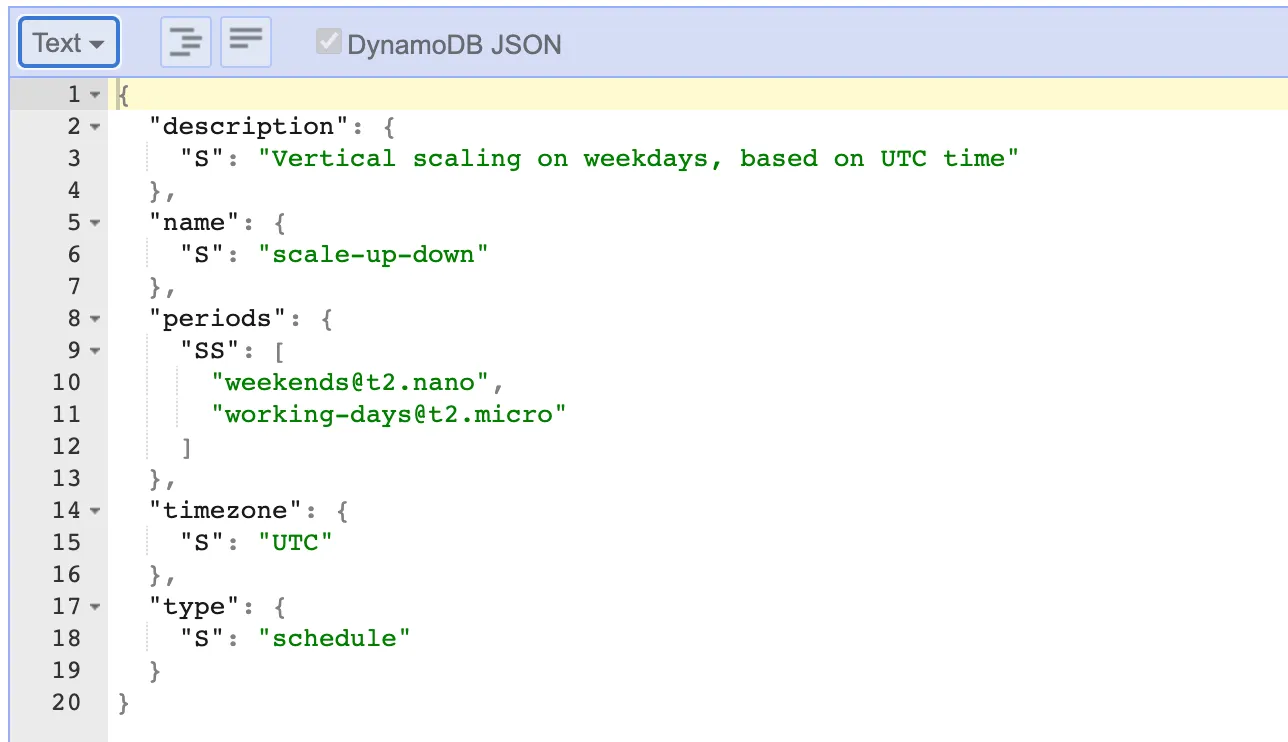
Schedules aren’t just for shutting down resources, they can also manage workload efficiency. For example, the Vertical Scaling on Weekdays schedule adjusts EC2 instance sizes, running smaller instances on weekends and micro instances during weekdays to optimize costs and performance.
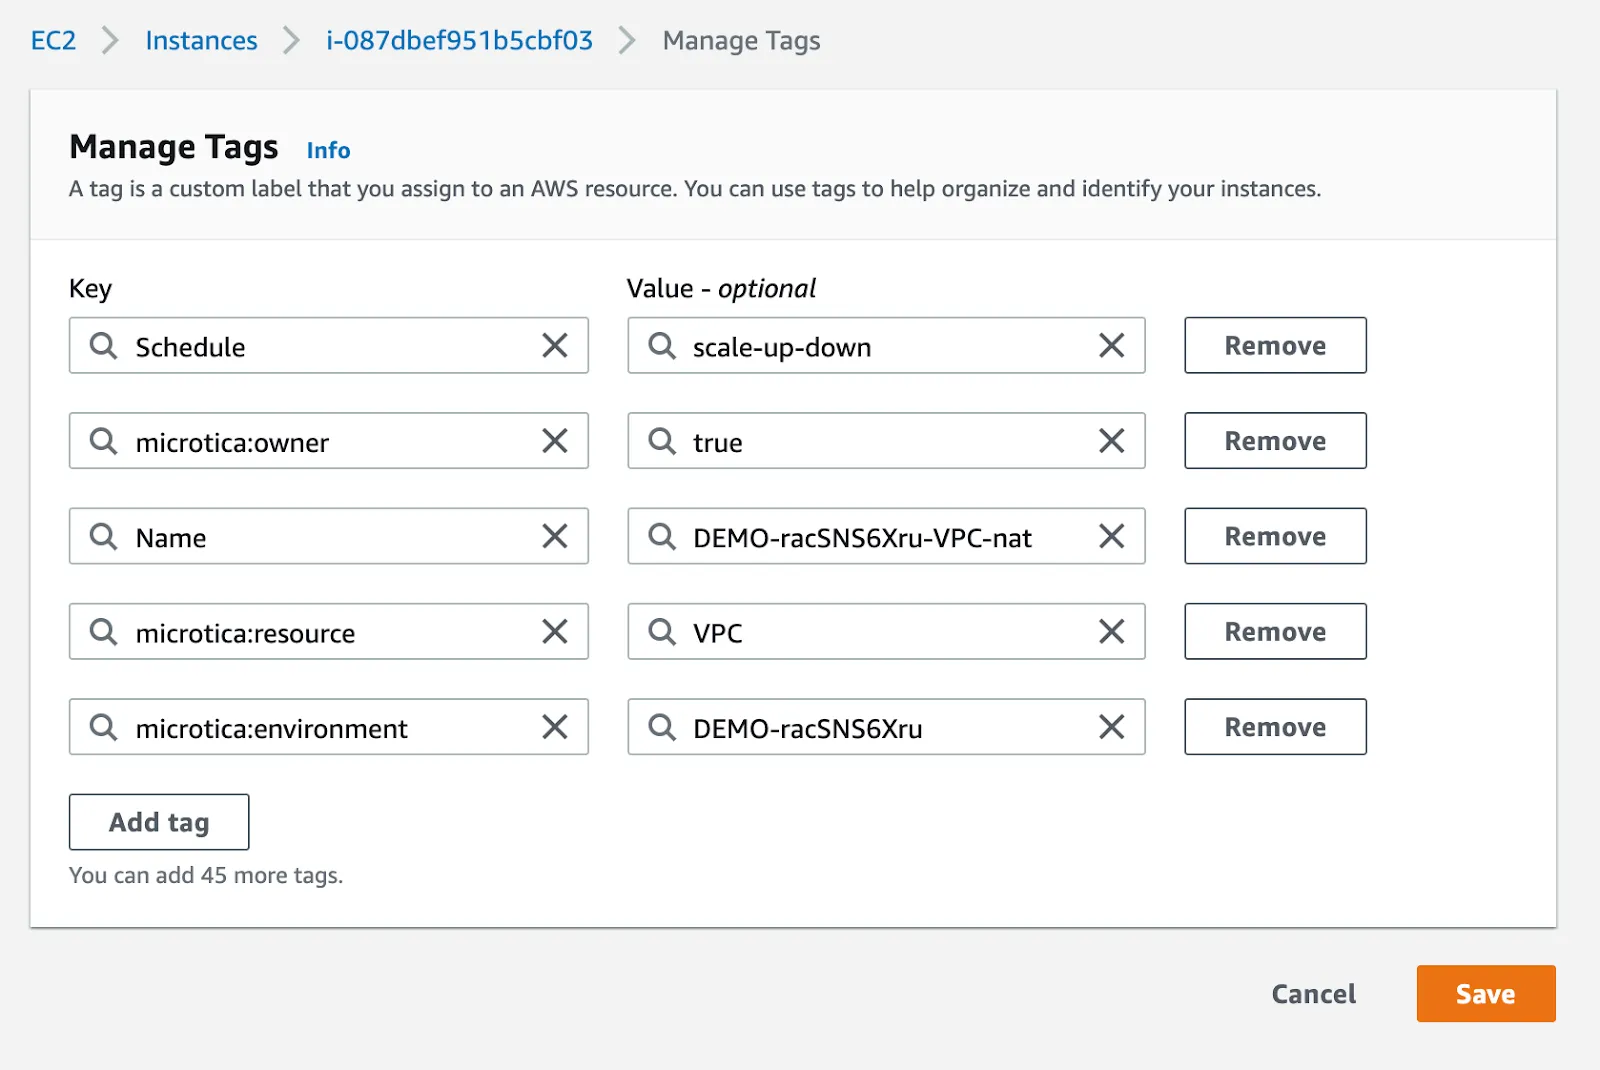
Step 3: Tagging Instances for Scheduling
In order for a schedule to work, you need to tag the EC2/RDS instances you want the schedule to be applied on. You should use the tag key (the tag name you defined when creating the CFN stack - default value is Schedule) and the tag value - which is the name of the schedule stored in the Config table. When you find your resource you go to Manage Tags and enter the key-value pair defining the schedule. You can also use the Tag Editor to tag multiple instances at once.
Step 4: Monitoring Schedules with CloudWatch
With CloudWatch, you can keep an eye on the performance of your AWS instances. It tracks things like how much CPU is being used or if instances are up and running as expected. You can check the CloudWatch metrics to make sure the solution runs as it's designed to. In the CloudWatch console, there will be a namespace, such as <stackname>:InstanceScheduler (DevInstanceScheduler:InstanceScheduler in our case), where you can monitor these metrics.
CloudWatch can also send you alerts or notifications if something isn’t right, helping you monitor the instance scheduler’s activity to ensure your instances are starting and stopping on schedule, saving you time and money. This makes managing your resources easier and more efficient.
Using Microtica for Instance Scheduling
If you prefer an alternative to setting up AWS Instance Scheduler manually, it is recommended to use Microtica’s Cloud Waste Manager feature. Microtica simplifies instance scheduling without needing to launch CloudFormation stacks.
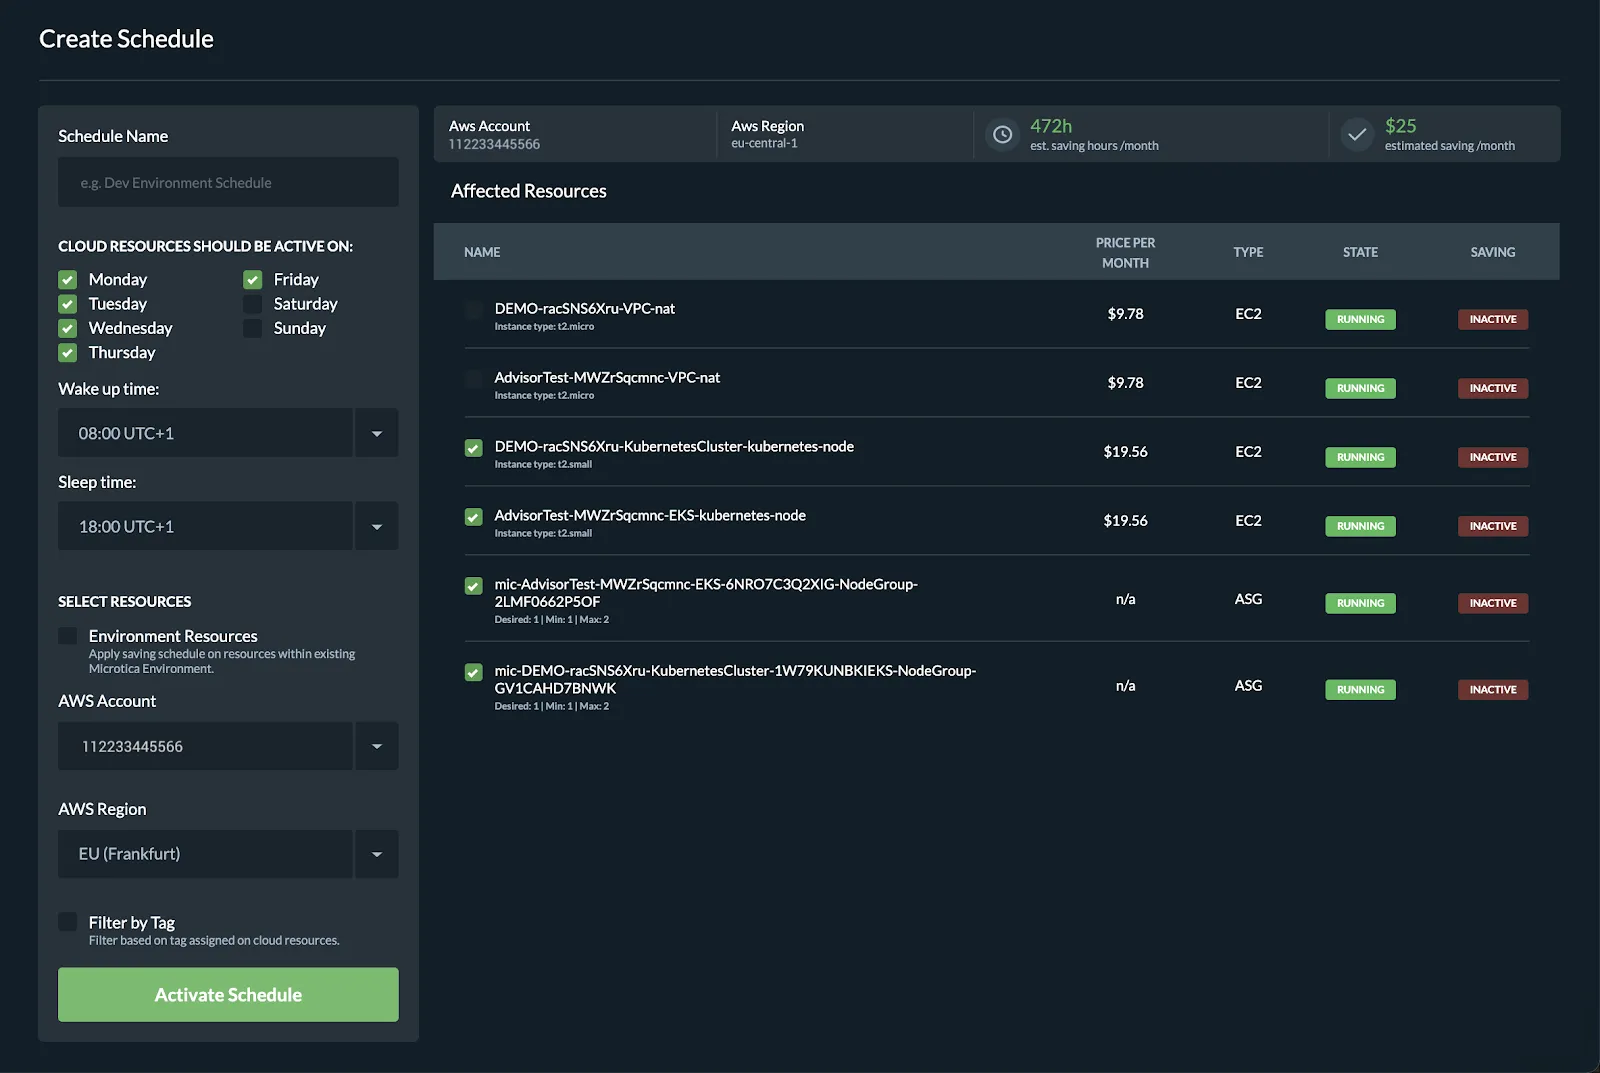
To set up saving schedules with Microtica:
- Sign up for free
- Connect your AWS account
- Set permissions only for turning instances on/off
- Go to Saving Schedules and select an active time period for your instances
- Select the instances you want to apply the schedule to
- Activate
Using Microtica for instance scheduling reduces setup complexity and provides a managed interface to optimize cloud costs efficiently.
Conclusion
To wrap up, AWS Instance Scheduler provides an effective way to manage EC2 and RDS instances, helping you reduce costs by automating start and stop times. Using tools like CloudWatch, Lambda, and DynamoDB, it streamlines resource management. Whether implementing basic schedules or more complex setups, this guide equips you with the knowledge to optimize AWS cost and usage, all while improving efficiency.
Frequently Asked Questions
What is an EC2 Scheduler?
An EC2 scheduler automates the start and stop of Amazon EC2 instances based on pre-defined schedules. This helps save costs by running instances only when needed, ensuring resources are efficiently managed and unused instances are turned off during off-hours.
What are Scheduled Instances in AWS?
Scheduled instances in AWS allow you to launch EC2 instances at specific times, repeating on a regular schedule. These instances are ideal for workloads that need to run periodically, such as development or test environments, to optimize cost and usage.
What is the Difference Between Instance Scheduler and Resource Scheduler in AWS?
An instance scheduler manages the start/stop times of EC2 and RDS instances based on predefined schedules. In contrast, a resource scheduler manages broader resource scheduling, including compute, storage, and network, to optimize cost and efficiency across various AWS services.

Relevant Posts