Serverless Infrastructure Component for a Translation Solution

In an era where technology is massively rising, it is crucial to consider the importance of customizability and reusability as the main goals of your project infrastructure. To employ the maximum potential of your applications and technologies, a convenient practice is to implement a strategy that makes use of components.
A component is an isolated piece of infrastructure that allows developers to define and reuse infrastructure in a standardized way. Once a component is created, it can be reused in a limitless number of projects and environments. In addition, it can be combined with other infrastructure components in any number of ways to build and deploy complex solutions. Finally, the components are combined and connected in environments, which are a place where you build infrastructure blueprints.
Microtica supports defining infrastructure in components by offering a distinct Infrastructure Template, written using AWS CloudFormation syntax. This approach has many benefits, such as having a complete overview and deep insights into the deployment history, promotion across environments (dev -> test -> production), and easy distribution of the infrastructure.
If you want to learn how to create custom infrastructure using the Microtica portal and reuse it on multiple projects, keep reading.
https://www.youtube.com/watch?v=Zm8StPo9wvs&ab_channel=Microtica
Preparation for the process
To start the process of creating a custom infrastructure component in Microtica, you will need to do certain preparations. In this blog post, you will learn how to create APIs for translation using a combination of three AWS services: Lambda, API gateway, and Amazon Translate service. The AWS Translate component from Microtica is available on our Github account.
This custom infrastructure can be used for translating massive volumes of user-generated content in real-time, text analytics, and enabling cross-lingual communications, breaking the language barriers. But most importantly, this is only one example of more complex infrastructure, and by following this tutorial, you can reuse your knowledge for future projects.
To start, you will need to install Yeoman generator so that you can create a Microtica component. This can be done by using the open-source Microtica generator, with the following commands:
sudo npm install -g yo
sudo npm install -g @microtica/generator-microtica-component
yo
The generator goes through some steps where you will need to specify the component's name (or, more specifically, Identifier) and the Git repository where the code is stored.
? Component Identifier (e.g. my-database) component-aws-translate
? Git repo URL git@github.com:microtica/component-aws-translate.git
Once the generator finishes, you can open up the project with the code editor to see how this component looks.
Exploring the project
In this step, you can see that several files have been created in your project. Here are the explanations of the most important ones:
- component.yaml file contains the specification of the component, for example: name, description, cfn_path, and schema_path.
- index.js file has hooks that can be executed on create and update of the component, like async functions for handle create and handle update.
- index.json file contains the cloud formation template. This has a default configuration at the moment, which is to create a simple S3 bucket, but you will update this in the later steps of the tutorial.
- microtica.yaml file contains the pipeline steps that should be executed in Microtica. Here we have two steps: Clone and Package, which contain the proper commands for execution.
- schema.json file, where the input and output parameters of the component are configured. You can remove the default values in the “properties” section, which were intended for the S3 component since they won’t be needed for the custom component which you’re going to create.
Now let's go back to the index.json file and update the CloudFormation template with a custom one. The new template creates two resources: Lambda and API Gateway. The Lambda function implements the Translate service, serving client requests to translate a given text.
const { Translate } = require("aws-sdk");
exports.handler = async function(event, context) {
console.log("EVENT", JSON.stringify(event));
const body = JSON.parse(event.body);
const { TranslatedText: translatedText } = await new Translate({ region: "eu-central-1" }).translateText({
SourceLanguageCode: body.sourceLanguage,
TargetLanguageCode: body.targetLanguage,
Text: body.text
}).promise();
const response = {
statusCode: 200,
body:JSON.stringify({translatedText})
};
return response;
}
You will notice that we've assigned a specific permission translate:TranslateText for the Lambda function to be able to access the Translate service and only the translate text API.
The Lambda function exposes an API on the route /translation that we will use later on to test out the functionalities of this component.
index.json
"Events": {
"ApiEvent": {
"Type": "Api",
"Properties": {
"Path": "/translation",
"Method": "post",
"RestApiId": {
"Ref": "ApiGatewayApi"
}
}
}
}
You also need to create an API gateway with the property “StageName”: “prod” in the template.
index.json
"ApiGatewayApi": {
"Type": "AWS::Serverless::Api",
"Properties": {
"StageName": "prod"
}
}
The output of this custom component will be the API URL where the client can access the Translate service and is defined in the “Outputs” section of the file.
Creating a pipeline and component in the Microtica Portal
The next step is to go to the Microtica Portal and create a pipeline for the custom component. The interface allows you to set a pipeline name, source from the Git repository, and the suitable branch, in this case, the master branch, as the automated trigger.
Then, you need to push the component to update the code in the Git repository and trigger the pipeline, seeing all the changes that happen with the commit.
While the pipeline is running, it’s convenient to define the custom component in Microtica, so you can have it as a ready-to-use infrastructure component that can be reused across multiple different projects.
In the interface, click on Create Component, input the name of the new component and select the pipeline that you just created.
To deploy this component in the cloud, you need to create a new environment. Before adding the component to an environment you need to wait for the pipeline to finish. This is the case because there needs to be at least one build for the component to be reflected in Microtica and to see its specification and output parameters.
Deploying an environment can be done in few simple steps:
- Click on Create Environment, input the name and description
- In the environment details view, you can go to the side menu and find all available Microtica components along with the custom-created ones.
- Choose the translate application component, add it to the environment, then trigger a deployment of this environment by clicking the Quick Deploy button.
- You will need to connect to an AWS account in the pop-up window if you haven’t done it already, or you can also do it from Settings --> AWS Account --> Connect
- Select your target AWS account where the infrastructure should be deployed in the “AWS Account” section of the Update Environment menu.
- Hit on Quick Deploy again to trigger the deployment of this environment.
With this, you can see insights for this deployment, for example, which component will be created, what changes will be deployed, and you can also follow the deployment logs in real-time.
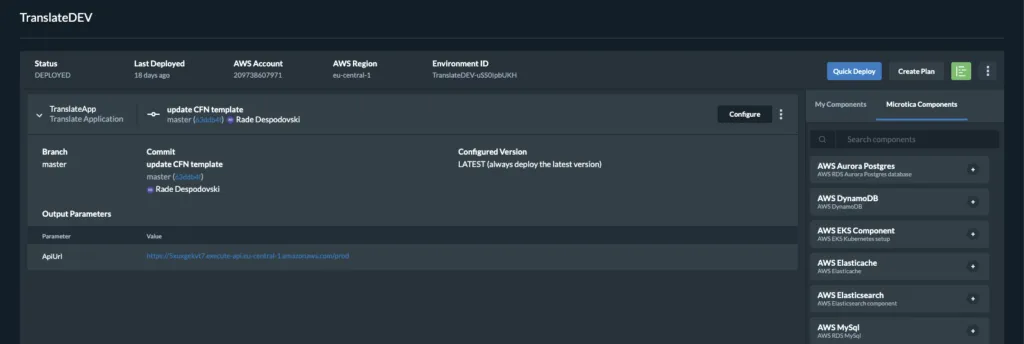
Once the deployment is finished successfully, it’s time to do some testing. Then, you can go back to Environment Details, expand the Translate App resource, and click on the output parameter ApiUrl to access the translate API.
You can use Postman for testing - create a POST request on the exposed API to translate the text “I am a developer” from English to French to see if it will work. With that, you have finished the process of creating a more complex custom infrastructure component in Microtica and deploying it on your cloud account.
Request body:
{
"sourceLanguage": "en",
"targetLanguage": "fr",
"text": "I am a developer"
}
Reusing Custom Infrastructure on multiple projects
If you want to avoid a lot of repetitive work when creating another environment (like test and production), you can reuse your custom infrastructure component on multiple projects. There is a possibility to replicate an environment with just one click, so let's learn how to create a production environment for the translation application.
In the Environments menu, click on the three dots on the right side of your translate environment, and choose Replicate. Then, input your name and description, and you can notice right away that the same infrastructure that you created in the previous development environment has been replicated in the new production one. Finally, click on the Quick Deploy button to deliver these changes to your prod AWS account.
You can also share your newly created custom component with another project. This can be done by going to the Components menu, selecting your component, and in the Component Details view, you can see the Share button in the top right corner. From there, select the project you'd like to share this component with.
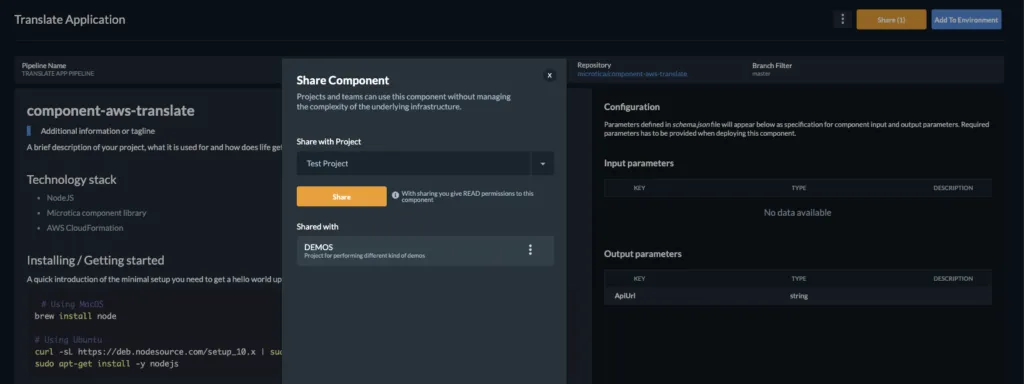
If you navigate to that project, you should see the shared infrastructure component available in the list in the Components menu of that project. With that, you can easily reuse this component in the new project, add it to an environment, and deploy it on your designated cloud account.
Final Thoughts
After finishing this tutorial, you are one step forward to knowing how to use Microtica to create your infrastructure, share it and reuse it as many times as you need for your applications. You can find this tutorial and more on our YouTube Channel, so you can learn to maximize the customizability, reusability, and effectiveness of your applications.

Relevant Posts